BSD Studio User Manual
# How to read
This manual is for photogrammetry and 3D reconstruction users new to BSD Studio, and can also serve project leads as a reference for purchasing, deployment and troubleshooting. Read chapters 1–4 to build your first model; if you already have external alignment results, go straight to chapter 6.
| Goal | Read |
|---|---|
| Understand the product in ten minutes | Chapters 1–3: workflow, hardware, installation and license |
| Build a model from samples or your photos | Chapters 4–8: data, automatic workflow, alignment and training |
| Deliver results | Chapters 9–10: viewing, editing, export and project management |
| Purchasing, maintenance and troubleshooting | Chapters 11–13: purchasing, support and FAQ |
Glossary
| Term | Meaning |
|---|---|
| Alignment / SfM | Solving camera positions and orientations from overlapping photos and generating a sparse point cloud. |
| Gaussians / 3DGS | A scene represented by many 3D Gaussians with color, scale and opacity that can be viewed in real time. |
| Training images | The final images used for Gaussian training; they may be original photos, video frames or undistorted panoramic views. |
| Mask | Pixel-level masks that exclude regions such as people or sky; not every scene needs them. |
| PLY / Mesh | PLY is commonly used for Gaussians and point clouds; a mesh is a triangle surface, commonly saved as PLY, OBJ or STL. |
# 1 Product and workflow
BSD Studio is Windows desktop 3D reconstruction software that creates and displays Gaussian scenes from photos, regular video, native panoramic video or external alignment results. A typical project goes through five stages: import, alignment, training, review and delivery.

1.1 Choose your entry point
| Entry point | When to use | What you do |
|---|---|---|
| Automatic workflow | New users, sample data, a single well-organized project | Drag in files, a folder or a video, check the settings in the wizard and start. |
| Step-by-step workflow | You want to check frame extraction, alignment and training one by one | Create a project, then run import, alignment and training in order. |
| External alignment import | Alignment already done in DJI Terra, RealityScan, Metashape, etc. | Choose the results on the matching import page, then check the images and camera poses. |
1.2 Before you start
- Make sure you may legally use the data; photos have enough overlap, sharpness and angle coverage.
- A stable NVIDIA driver and enough VRAM and disk space; large high-resolution scenes need more headroom.
- Use a separate working folder for each project; do not move source data or clear temporary files while training.
# 2 Hardware, download and installation
| Item | Minimum | Recommended |
|---|---|---|
| Operating system | Windows 10/11 64-bit | Windows 11 64-bit with stable system and GPU driver versions |
| CPU | 64-bit x86, 4 cores / 8 threads or more e.g. Intel Core i5 / i7, 8th–10th gen or AMD Ryzen 1000–2000 series | 8 cores / 16 threads, or 12 cores / 24 threads and above e.g. Intel Core i7 / i9, 12th–14th gen or AMD Ryzen 5000 / 7000 / 9000 series |
| GPU | NVIDIA discrete GPU (GTX 1060 6 GB or better) | NVIDIA RTX 30 / 40 / 50 series, 8–24 GB VRAM or more |
| Memory | 8 GB | 16 GB or more; 64 GB or more for large scenes |
| Storage | A local disk with enough free space | SSD with room for source data, alignment files, checkpoints and exports |
2.1 Hardware and system
2.2 Download from the website
2.3 First launch checks
- The main window opens normally, with the license status and language switch in the top-right corner.
- Open the Help page to see the version number; include it when you report a problem.
# 3 Sign-in, license and plan limits
3.1 Sign up / sign in with email
3.2 Basic vs. Pro
| Capability | Basic | Pro |
|---|---|---|
| Final training images | Up to 600 per project | No 600-image limit; limited only by your hardware |
| Regular video | Up to 10 minutes, and no more than 600 final training images | Depends on license and hardware |
| Native panoramic video | Up to 1 minute, and no more than 600 final training images | Depends on license and hardware |
| External alignment import | As shown in the app for your license | Included |
| Tiled training, model / mesh export | High-precision mesh extraction and tiled large scenes (depending on system resources) | Full Pro feature set, seamless tiled processing of large scenes and high-resolution model export |
“600 images” means the final images that go into training, not the number of files in the import list. Placing external alignment results into the project folder by hand does not bypass the image-count check on AT/images before training.
# 4 Preparing and capturing data
4.1 Photo projects
- Shoot continuously around the object or scene with clear overlap between neighboring photos; do not capture only the front while missing the sides, back and top.
- Keep images sharp and exposure stable; avoid heavy motion blur, overexposure, purely reflective surfaces and large textureless areas.
- For large indoor scenes, cover doorways, corners and long corridors that connect areas; for large outdoor scenes, capture both close-up detail and overall structure.
- Put the images for one project in their own folder. Remove obvious duplicates, out-of-focus and unrelated photos before importing.
4.2 Video projects
Regular video supports common formats such as MP4 and MOV, and frames are extracted at the frame rate you set. On Basic, set 1 FPS explicitly in the import settings and check the final image count after extraction. Long or fast-moving video adds duplicate or blurry frames and does not necessarily improve results.
Native dual-fisheye panoramic video (.insv / .osv) is supported; check that it is detected as panoramic when importing. The app extracts frames and then undistorts them into training views. The number of views per frame depends on the camera and undistortion settings, so one minute does not automatically mean 60 training images.
4.3 Pre-capture checklist
| Check | Pass criteria |
|---|---|
| Coverage | All main visible sides of the subject are captured, with no obvious gaps. |
| Overlap | Neighboring views share recognizable features; corners and connections have transition images. |
| Moving objects | People, cars and foliage take up little of the frame; enable people masking if needed. |
| File organization | Source data is backed up and readable, and the project folder has enough space. |
| Copyright / privacy | You have permission to capture and process the data; sensitive information is anonymized as agreed. |
# 5 Automatic workflow: your first model
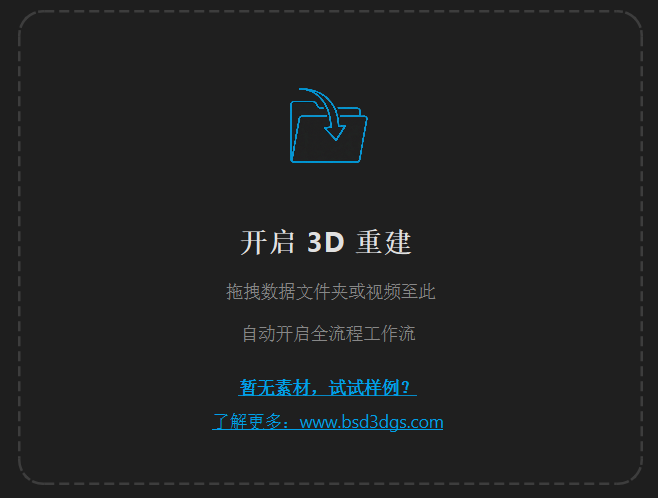
Best for first use and sample data. Drag a data folder or video onto the “Start 3D reconstruction” area on the right of the main window, or click the sample-data prompt to follow the sample guide.
# 6 Step-by-step workflow: projects and media
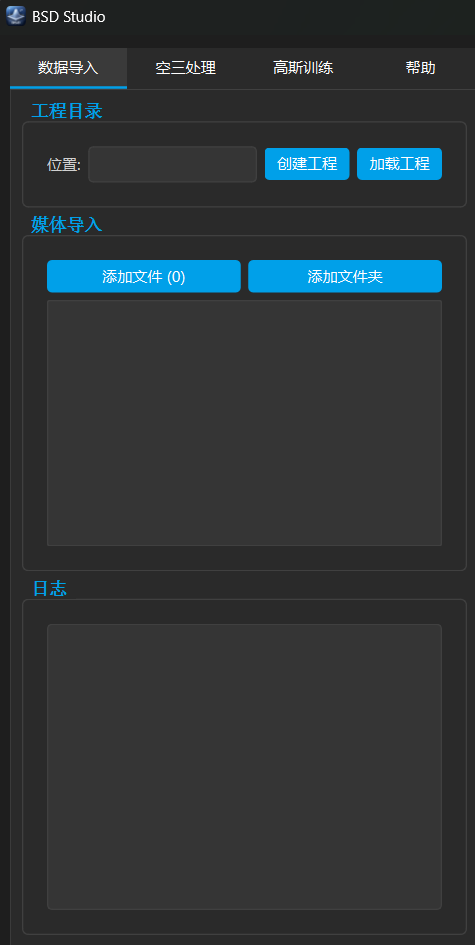
6.1 Create and load a project
6.2 Import photos, video and panoramic video
# 7 Camera alignment and external results
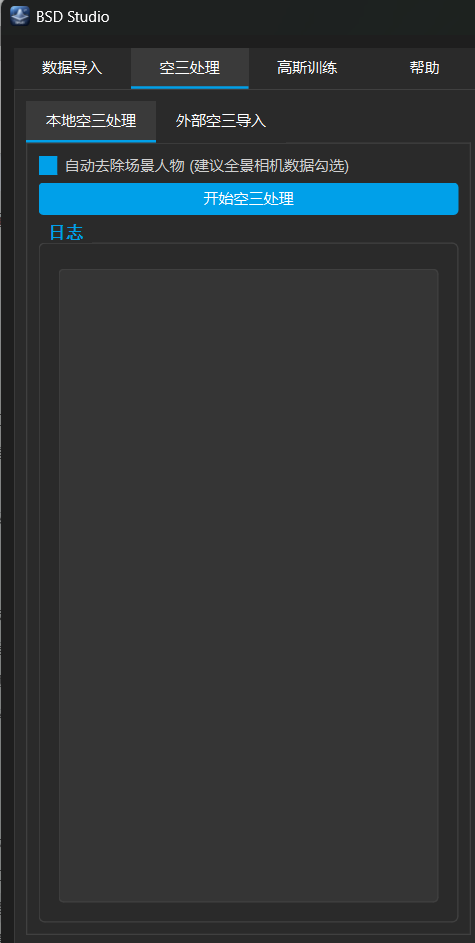
7.1 Local alignment
7.2 Import external alignment (Metashape / RealityScan / DJI Terra)
If you already have alignment results from photogrammetry software such as Agisoft Metashape, RealityScan or DJI Terra, you can import them into BSD Studio for 3DGS training and skip local feature matching and solving. Each tool exports a different file structure and coordinate system, so follow the steps below.
7.2.1 Export and import from Metashape
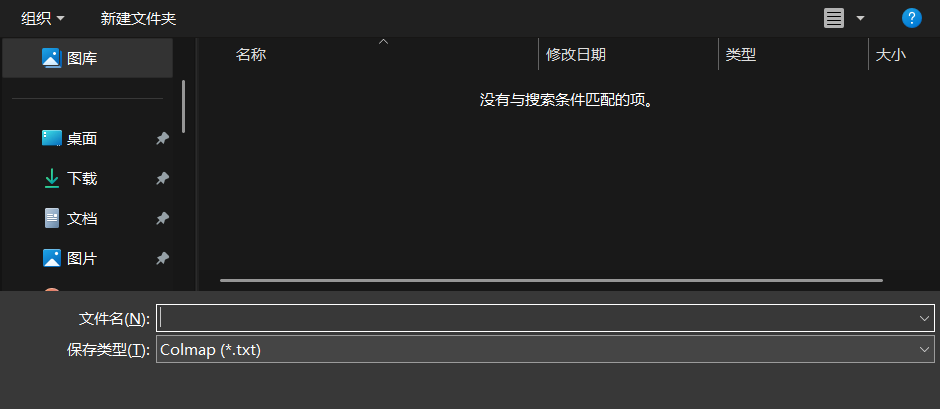
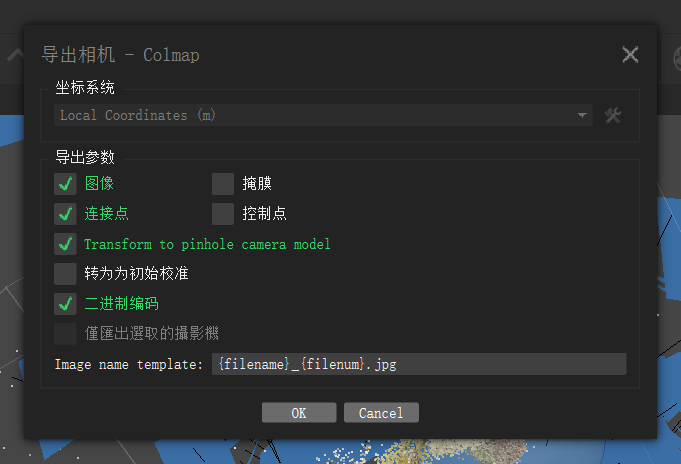
| Option | Recommended | Purpose |
|---|---|---|
| Export format | COLMAP (*.txt) | Exports standard camera intrinsics, extrinsics and the sparse point cloud |
| Save points | Yes | Writes sparse/0/points3D.txt, used to initialize Gaussian training |
| Export intrinsics | Yes | Writes cameras.txt with focal length and principal point |
| Export extrinsics | Yes | Writes images.txt with each view's quaternion and translation |
| Undistort | As needed (recommended if the original images have strong distortion) | Keeps pixel projection consistent with the pinhole camera model |
- Option 1 (drag and drop): drag the images and sparse folders together into a fresh BSD Studio main window. The app recognizes the standard COLMAP structure and opens the 3DGS training wizard.
- Option 2 (from the UI): under “Alignment”, open “External alignment import”, choose “Reality Scan” in the source list (RealityScan and Metashape exports share the same structure), click “Browse”, select the folder and import.
7.2.2 Export and import from RealityScan
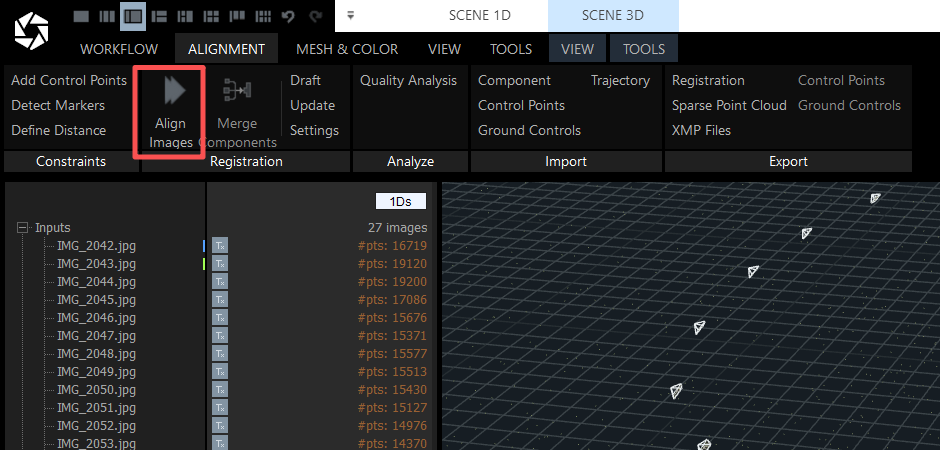
Then export in standard COLMAP format.
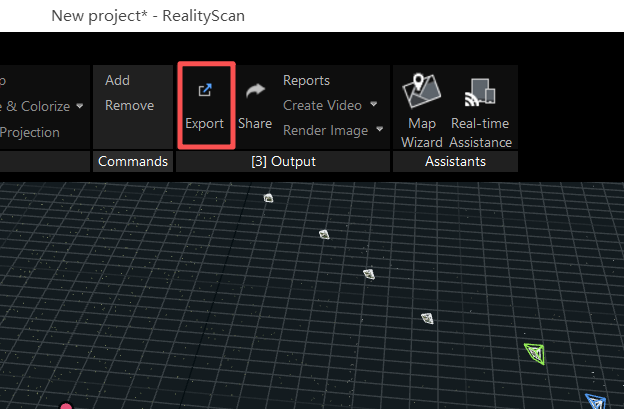
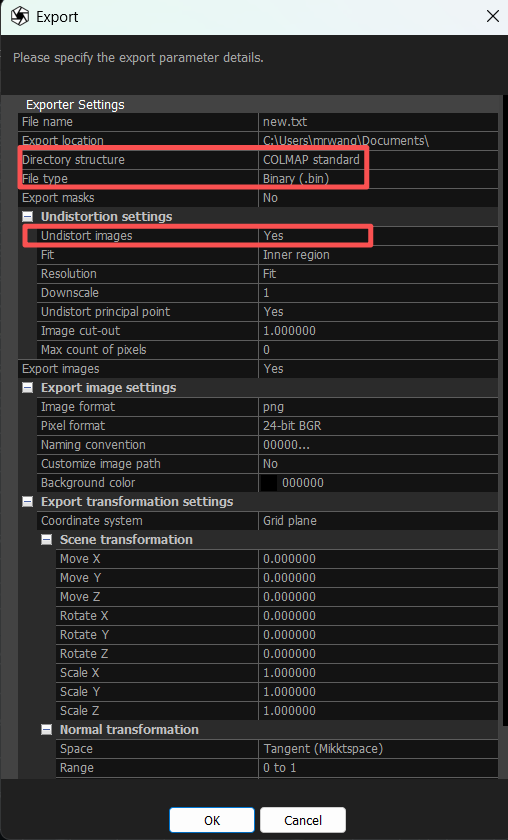
| Key option | Value | Notes |
|---|---|---|
| Export format | COLMAP standard (*.bin / *.txt) | Exports a standard COLMAP sparse model |
| Export type | Binary (*.bin) or Text (*.txt) | BSD Studio reads both |
| Undistort images | Yes (True) | Undistorted images must be exported so camera poses and pixels line up exactly |
7.2.3 DJI Terra and LiDAR
# 8 Gaussian training and evaluation
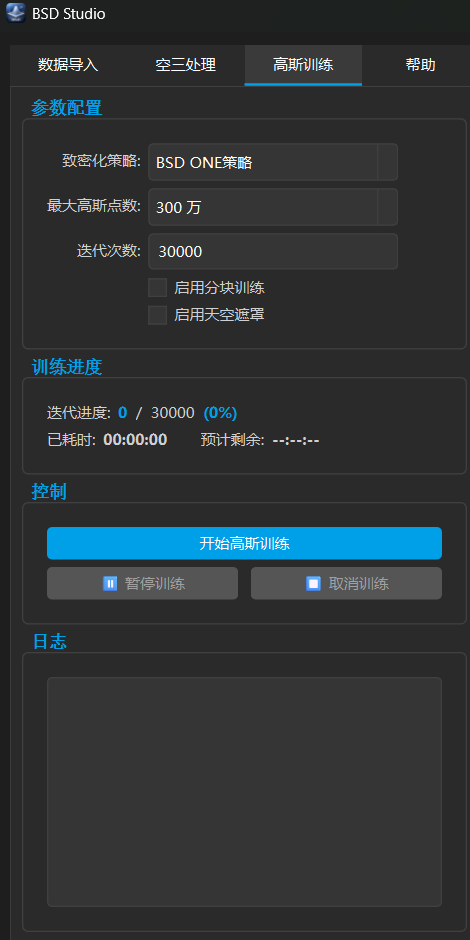
8.1 Parameters
| Parameter | What it means | First-run advice |
|---|---|---|
| Densification strategy | Controls how Gaussians are added, split and pruned. | Start with BSD ONE as the baseline for comparison. |
| Max Gaussians | The upper limit on Gaussians during training; higher is not always better. | Start at 3 million and lower it if VRAM runs out. |
| Iterations | Number of optimization steps; more training does not necessarily remove structural artifacts. | Start with the default 30,000 and judge from the preview. |
| Tiled training | Splits a large scene to manage resources. | Enable only for genuinely large scenes or VRAM pressure. |
| Sky mask | Keeps the sky from being modeled incorrectly. | Enable for outdoor scenes with visible sky. |
8.2 Start and monitor
# 9 3D viewer, editing and export
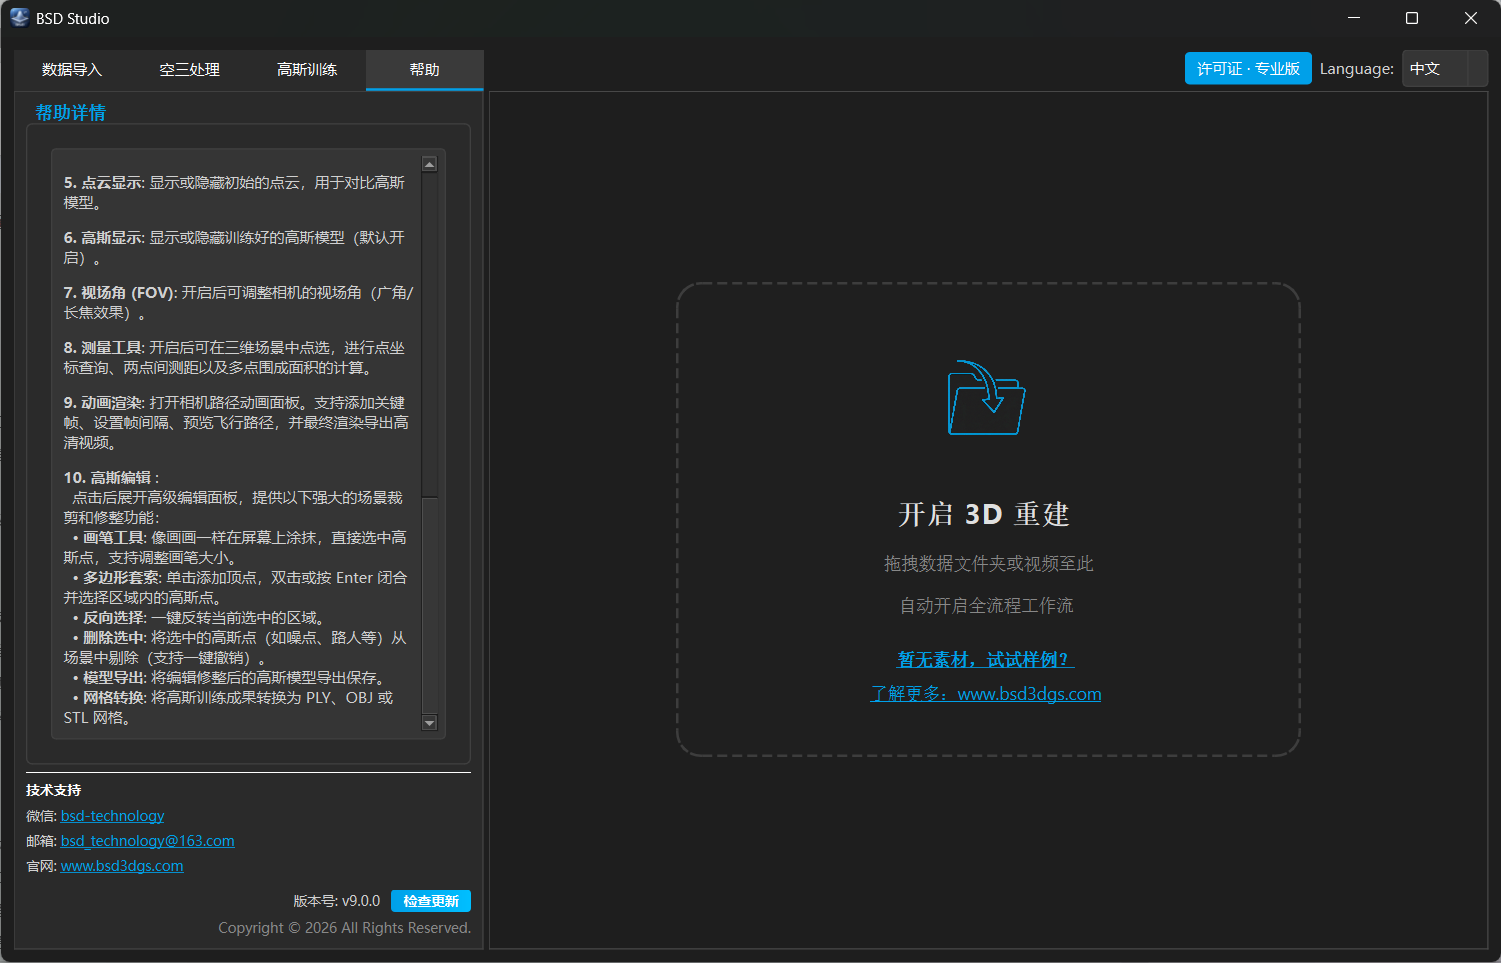
After training or loading a model, use the 3D viewer on the right to inspect it. The icon order follows the current version; the tools are described by function below so this guide does not depend on how the toolbar looks in a particular version.
| Tool group | Purpose |
|---|---|
| Navigation & display | Reset view, rotation center, field of view, camera poses, grid, point cloud / Gaussian toggle |
| Measurement | Coordinates, distance, area |
| Animation | Add keyframes, preview the path, render video |
| Gaussian editing | Brush, lasso, invert, delete, undo |
| Output | Model export and mesh conversion |
9.1 Cleaning floaters
# 10 Saving, archiving and reproducibility
Treat a project as a traceable set of data: source data, preprocessing results, alignment, training parameters, training logs and final exports. Keeping only the final PLY is usually not enough to reproduce training or investigate problems.
| Archive level | Keep |
|---|---|
| Source | Original photos / videos, camera and lens information, external alignment packages. |
| Project | Project folder, Data, AT, training configuration / checkpoints and related logs. |
| Delivery | Final Gaussians / meshes, thumbnails, version and usage notes. |
Recommended project naming
Use “Site/Object_CaptureDate_DataType_Version”, for example SubstationA_20260929_Photo_v01. Do not put personal contact details or confidential client information in shared export file names.
# 11 Buying Pro and managing your license
11.1 Before you buy
11.2 Purchase and refunds
Pro currently costs $19 per month (30 days) or $159 per year (365 days); taxes may be added at checkout depending on your country. We recommend evaluating your hardware and results with Basic and the free 14-day Pro trial first. Pro is activated on your account as soon as payment is confirmed. If you are not satisfied, you can request a full refund within 14 days of payment under our Refund Policy. Receipts are sent by email after payment.
# 12 Support and troubleshooting
12.1 Contact
Website: https://www.bsd3dgs.com/en/ Email: bsd_technology@163.com Support hours: Monday–Friday 09:00–18:00 China Standard Time (UTC+8). Before reporting a problem, check the version number and system information under the app's Help menu so we can help you faster.
12.2 What to include in a report
- App version, Windows version, GPU model / VRAM and GPU driver version.
- Stage where the problem occurs: download, installation, sign-in code, import, frame extraction, alignment, training, 3D viewing or export.
- Steps to reproduce, error screenshots, the time it happened and the related project log.
- Data type, number of source files and number of final training images; for purchase issues, also the order number and payment time.
- Anonymize sensitive client data first; do not send complete source data without permission.
12.3 Six things to check first
| Symptom | Check first |
|---|---|
| Install / launch fails | Installer source, Windows permissions, security software, GPU driver. |
| No sign-in code received | Email address spelling, spam / junk folder, network, resend interval and daily limits. |
| Basic limit exceeded | Final training images in AT/images; video FPS and number of undistorted panoramic views. |
| Alignment fails / few cameras | Image sharpness, overlap, extraction interval, external alignment file structure. |
| Slow training or out of VRAM | VRAM usage, image / Gaussian counts, tiled training and other GPU tasks running in the background. |
| Floaters / blur | Check camera poses, masks and capture coverage first, then consider retraining or local editing. |
# 13 FAQ
Q1 Why can a 10-minute video or 1-minute panoramic video still exceed the Basic limit?
Because the final training images are also limited to 600. A 10-minute video at 1 FPS gives about 600 frames; a 1-minute panoramic video at 1 FPS gives about 600 views after undistortion. A higher FPS or extra photos can exceed the limit.
Q2 I already have DJI Terra or RealityScan alignment. Do I need to align again?
No. Use it directly.
Q3 Floaters remain after more iterations. What should I do?
First check the capture angles, camera poses, moving areas and separation between background and subject. Floaters do not necessarily disappear with more iterations; clean small areas with the editing tools and keep the original model.
Q4 Can I continue a project on another computer?
Yes. Back up the project and any externally referenced source data first, then load it on the new computer to check. An account can be signed in on one computer at a time; sign out the old one on the Devices page, or contact support if you see a device limit.
Q5 Can older GPUs such as the GTX 10 series run BSD Studio?
Answer: yes. GTX 1060 (6 GB), GTX 1070, GTX 1080 and GTX 1080 Ti can all run local alignment and 3DGS training. Since the GTX 10 series usually has 6–11 GB VRAM, keep the maximum Gaussians between 1.5 and 3 million during training and update to the latest GPU driver.